1M Ohm Resistor Color Code — Megohm Measurement & High-Z Design
1 MΩ color code (Brown-Black-Green-Gold): DMM measurement protocol, body-leakage errors, 1 MΩ×1 µF timer, op-amp bias math, HV bleeder safety.
Decode band colors instantly
Full index: All resistor color code values
1 MΩ (megohm): when color codes aren't enough
Brown · Black · Green · Gold → $10 × 10^5$ = 1 MΩ. The green multiplier band means ×100 k — the main failure mode is confusing 100 kΩ (yellow multiplier) with megohm parts.
4-band: Brown · Black · Green · Gold → 10 × 100,000 = 1,000,000 Ω = 1 MΩ (±5%) · 5-band (±1%): Brown · Black · Black · Yellow · Brown → 100 × 10,000 = 1 MΩ (±1%)
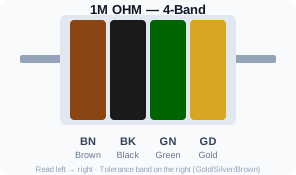
This guide covers measurement physics and high-impedance design — not LEDs, dividers, or I²C. Those topics live on 220 Ω, 1 kΩ, and 4.7 kΩ respectively.
Measuring 1 MΩ correctly (procedure)
Standard DMM tips fail at megohms:
- Out of circuit — any parallel path dominates
- Do not touch probe metal or the resistor body — skin adds 100 kΩ–1 MΩ in parallel
- Hold one probe tip only or use insulated clips
- Zero the meter in the same range before measuring
- Expect 950 kΩ – 1.05 MΩ for ±5% carbon film
Humidity and dust on the PCB can shunt 1 MΩ networks — clean dry boards for repeatable readings.
1 MΩ × 1 µF = 1 second (timer you can build)
| R | C | $\tau = R×C$ | 5τ to ~99% |
|---|---|---|---|
| 1 MΩ | 1 µF | 1 s | ~5 s |
| 1 MΩ | 100 nF | 100 ms | 0.5 s |
Identify the 1 MΩ leg by brown-black-green before wiring — a 100 kΩ mistake changes timing by 10×.
Op-amp input bias error (order-of-magnitude)
If input bias current $I_b ≈ 10 nA$ flows through 1 MΩ feedback:
$V_{error} ≈ I_b × R = 10 nA × 1 MΩ = 10 mV
That's visible in millivolt sensor chains — choose lower R or a CMOS op-amp with pA bias. Color code identifies R, not op-amp suitability.
High voltage & bleeder safety (read before touching)
Megohm resistors in HV supplies can dissipate significant power if sized wrong: $P = V^2/R$. At 400 V into 1 MΩ, $P = 0.16 W$ — verify rating. Always discharge through designed bleeders and verify with a rated meter — not just color bands.
5-band 1 MΩ precision
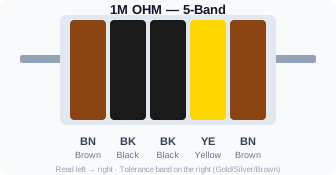
Brown · Black · Black · Yellow · Brown → $100 × 10k$ = 1 MΩ ±1%. Yellow multiplier (×10⁴) vs green (×10⁵) is the critical distinction from 100 kΩ parts.
FAQ
What is the 1M ohm resistor color code?
4-band (±5%): Brown, Black, Green, Gold. 10 × 100,000 = 1,000,000 Ω = 1 MΩ (±5%). Actual range: 950 kΩ – 1.05 MΩ.
What is the 1M ohm resistor colour code (5-band)?
Brown · Black · Black · Yellow · Brown → 100 × 10,000 = 1 MΩ (±1%). Range: 990 kΩ – 1.01 MΩ.
How do I read a 1M ohm resistor color code?
Read left to right: first bands are digits, then multiplier, then tolerance. For 1 MΩ: Brown-Black-Green = significant digits & multiplier, Gold = tolerance. Use the color code calculator to verify.
Which end do I start reading a 1 MΩ resistor from?
Start from the grouped digit bands (left). The tolerance band (Gold) is on the right — gold and silver are almost always tolerance, not multipliers.
What is the difference between 4-band and 5-band for 1 MΩ?
4-band (Brown · Black · Green · Gold) gives 10 × 100,000 = 1,000,000 Ω = 1 MΩ (±5%) with typical ±5% gold tolerance. 5-band (Brown · Black · Black · Yellow · Brown) adds a third digit for ±1% precision: 100 × 10,000 = 1 MΩ (±1%) (990 kΩ – 1.01 MΩ).
What is the 1M resistor color code?
Brown-Black-Green-Gold (4-band) or Brown-Black-Black-Yellow-Brown (5-band ±1%).
How do I measure 1M ohm accurately?
Use a DMM with high-range accuracy, avoid parallel leakage, and measure out of circuit.
Related guides (different topics)
- 10 kΩ color code — button pull-ups & NTC dividers
- 100 Ω color code — RC τ table & wattage at 12 V
- 1 kΩ color code — divider math & strong pull-ups
Topic cluster
More resistor color code guides
Learn the method in our beginner's guide · Decode instantly with the color code calculator